
Get your restaurant live
The sign-up wizard, the menu import, the finish screen, and the seven Kickoff steps in order.
Getting live has two parts. The sign-up wizard creates your restaurant and brings your menu in, one question per screen. Kickoff then lists everything else, from your logo to a tested AI waiter, and ends with the button that puts your menu live.
Create your account
- 1Open the sign-up page
Go to Create your free account and select Continue with Google, or type your Email address and select Continue with email.
- 2Enter the code
With email, tamr sends a 6-digit code. Type it on Check your inbox. The code works for 5 minutes; Send a new code gets a fresh one. You do not set a password here. See Sign in and keep your account safe →.
If you were invited to a restaurant, the code takes you straight to the invitation instead of the wizard.
Answer the sign-up wizard
The wizard asks one question per screen. A bar at the top shows how far you are, and you can go back to the previous question.
- 1Find your restaurant
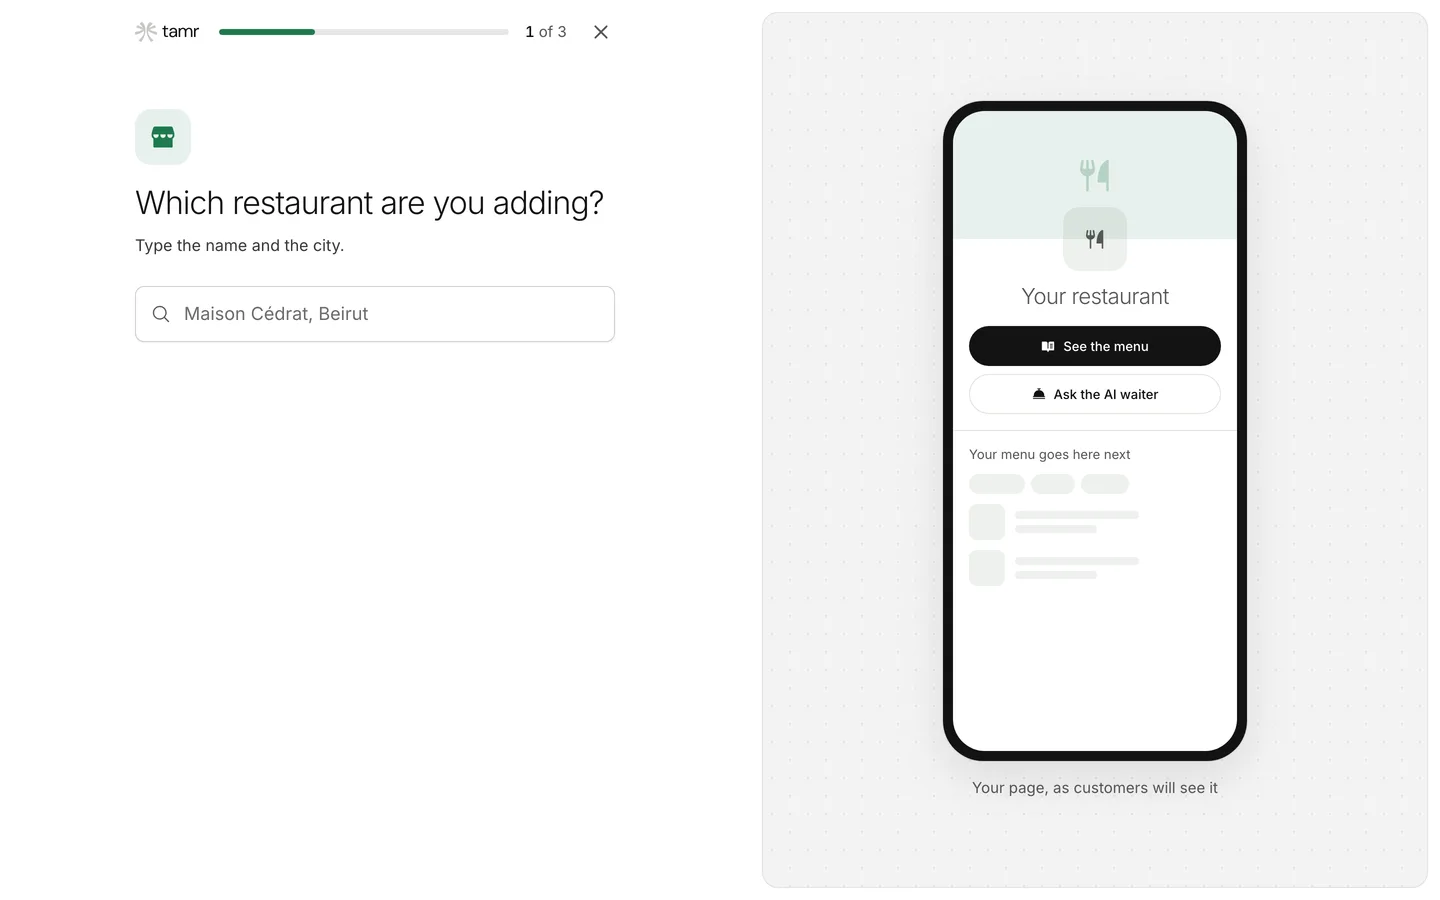
What's your restaurant called? Type the name and the city. tamr looks it up on the map. Pick yours and confirm on Is this your restaurant? with Yes, that's us, which fills in the address and details for you. Not listed? Select Mine isn't in the list and tell tamr Where is your menu online? (a website or an Instagram page).
- 2Leave your WhatsApp number
What's your WhatsApp number? So someone from tamr can help you go live.
- 3Tell tamr who you are
And who are you? Owner, Manager, Marketing or Something else. Then How many locations do you have? Just one, 2 to 5, 6 to 20 or More than 20.
- 4Pick what matters first
What should tamr do for you first? Pick as many as you like: Answer questions, Take orders at the table, Take bookings, Know my customers and Sell more per table. Select Set up my restaurant. This creates your restaurant and its first location.
- 5Bring your menu in
How do you want to add your menu? Upload a PDF, upload photos (one photo per printed page), paste a link to your menu page, upload a spreadsheet (Excel, Sheets or CSV, one dish per row) or start from scratch. tamr reads it and your dishes appear as they are read. You check the draft before anything goes live. Skip, add it later takes you on without a menu.
Finish set-up
The last screen is honest about where things stand.
Reading your menuin progressAlmost thereprices missingYou're livedoneThree next steps follow: Add your brand (logo, colour, fonts), Finish your kickoff (hours, house rules, photos) and Invite your team (managers and hosts).
Work through Kickoff
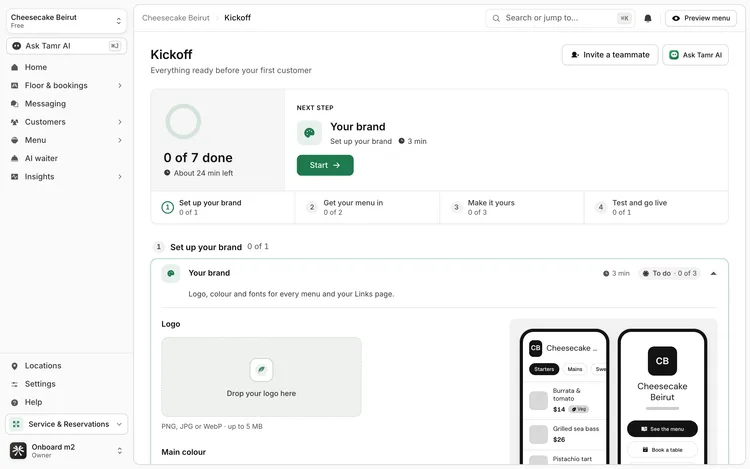
Kickoff is the guided path from a menu to a menu you trust. Open it from Finish your kickoff, from Open your kickoff checklist on Home, or from the card at the foot of the sidebar (Open kickoff). The top of the page shows how many steps are done, about how many minutes are left, and the Next step with a Start button.
Each step opens in place with the tool that does it, so you rarely leave the page. Its chip reads To do, Started, or After the menu when it waits on your dishes.
- 1Set up your brand · 3 min
Your brand: your logo, main colour and font, used on every menu and your Links page, with a phone preview beside it. Logo and colour complete the step; the font is optional. More on the Brand page opens the full page. See Your brand →.
- 2Your menu · 2 min
Done once the menu has dishes. Before that, Upload your menu. After, Open the menu or Import a spreadsheet. Spreadsheet template downloads the importer's columns with two example dishes. See Import a menu →.
- 3Dish details · 5 min
Descriptions, ingredients and allergens. The step counts dishes with no description, no price and no allergens marked. Draft with Tamr AI writes what is missing for you to approve; Review in table view opens the menu as a table. See Edit dishes →.
- 4Hours, address and phone · 3 min
Opening hours, address and phone for each open location. It counts locations without hours, an address or a phone, and opens the first one to fix. See Locations →.
- 5House rules · 4 min
Ten quick questions customers ask the AI waiter: bookings, delivery, halal meat, alcohol, a kids' menu, vegetarian or vegan options, dress code, parking, how customers can pay, and free Wi-Fi. Answer Yes or No (how customers pay is a line of text), add a detail if you like, and select Save answers. Each answer becomes one line in the menu's AI waiter notes. See House rules →.
- 6Dish photos · 5 min
Match to dishes pairs the photos you have with your dishes on the Media page. Generate the missing ones asks Tamr AI to create photos for dishes without one (AI photos are Pro). See Media →.
- 7Test the AI waiter · 2 min
Run the test asks the AI waiter what customers ask and scores it. A score of 80 completes the step. Below the score you see what it missed; fill each one in place, then Test again. Full results opens the whole test. See Test your AI waiter →.
Go live
The last row of Kickoff puts the menu live. Once the menu has dishes and the test scored 80 or more, select Publish. You can Publish anyway before that. Only an admin can publish. When it is live, the row says customers can open it.
A menu with real dishes and a tested AI waiter is enough. Publish, then use Couldn't answer on Home to teach the AI waiter what real customers ask.
Add another restaurant
Running a second restaurant with its own brand and menu? Open the restaurant switcher at the top of the sidebar and select Add restaurant. You go through the same two screens: find it on the map, then bring its menu in.
For more locations of the same restaurant, add a location instead. See Locations →.
FAQ
I closed the browser during the wizard. Do I start again?
No. Sign in and the wizard picks up from the last step it saved.
Do I have to finish every Kickoff step before going live?
No. Publish anyway puts the menu live at any point. The steps make sure customers get good answers on day one.
Can a teammate help with Kickoff?
Yes. Invite a teammate at the top of Kickoff opens Settings → Members. Free includes one team member; Pro has unlimited seats. See Team and roles →.
Related
Last reviewed October 14, 2026